Are you looking to build your own pickleball court in your backyard? You’ve come to the right place! Check the most complete DIY Pickleball Court Construction Guide.
Whether you’re a seasoned DIYer or a newbie, our step-by-step guide will help you construct a professional-grade court that you can enjoy with friends and family. Plus, building a court is a fun and rewarding project that will add value to your property.
So let’s get started on this exciting journey of building your own DIY pickleball court!
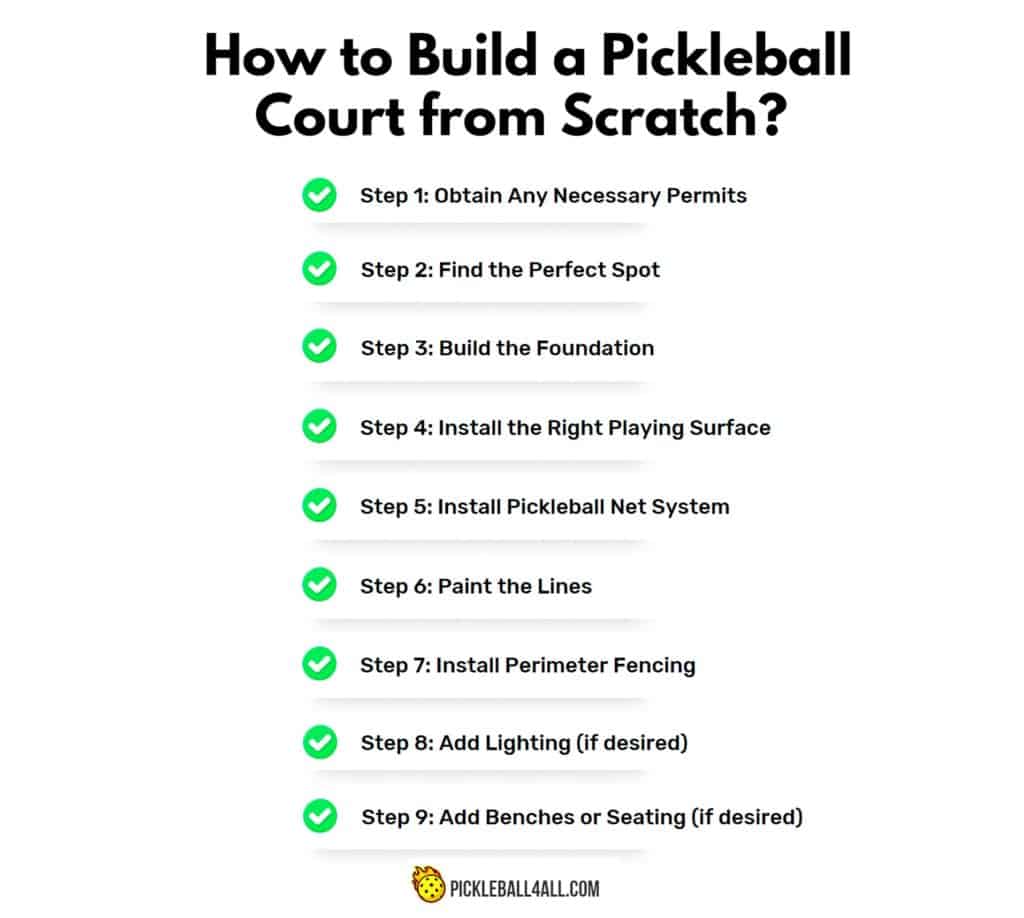
How to Build a Pickleball Court from Scratch?
To build a pickleball court from scratch, first, measure and mark the court dimensions (44 by 20 feet). Level the ground, then lay a concrete or asphalt base. Apply a coat of acrylic resurfacer, followed by a layer of colored surface paint. Finally, mark the lines and install a net.
All Materials List: What You’ll Need to Build DIY Pickleball Court
It’s important to have everything on hand before starting construction to avoid any unnecessary delays or trips to the store.
To make things easier, consider buying a pickleball court construction kit. It includes all the materials needed for the job. These kits are convenient and often come with detailed instructions, making the process less daunting for first-time builders. Some popular brands include VersaCourt, SportCourt, and SnapSports.
Complete List of Materials to Build Backyard Pickleball Court
Here’s a complete list of what you’ll need:
Step 1: Planning Your DIY Pickleball Court Construction
Before you start digging, take some time to plan out your project. Consider your budget, decide on the best spot for your court, and obtain any necessary permits or permissions.
DIY Pickleball Court on a Budget: Tips for Saving Money on Your Build
Building a budget-friendly backyard pickleball court is a great option for those who want to enjoy the game without breaking the bank. Budget courts typically cost around $5,000-$10,000 to construct pickleball courts.
Here are some tips for building on a budget:
- Choose cost-effective materials. Consider using materials like asphalt or concrete for the base layer instead of more expensive options like rubber or acrylic. Use cheaper materials for perimeter fencing such as chain link or wire mesh.
- Choose the right location that doesn’t require extensive site preparation. The less you have to clear and level the land, the less expensive your build will be.
- Recruit friends and family for labor. The more hands you have on deck, the faster the construction process will go.
- Shop around for deals. Take the time to compare prices at different home improvement stores to find the best deals on materials.
- Use recycled materials. One way is to use recycled materials, such as old tennis court fencing or repurposed lumber.
- Opt for a smaller court size. You can build a half-court if you have limited space or budget constraints.
- Opt for a portable net system instead of a permanent one.
- Skip the lighting and benches, which can add significant costs to your project.
Building a budget pickleball court is a great option if you’re looking to save money on your project. On the other hand, if you want to invest in a high-quality court that will last for years to come, a premium one may be the way to go.
Go for Gold: Building a Premium DIY Pickleball Court
If you want to create a more premium backyard pickleball court, there are some options to consider:
- Choose high-end materials. Consider using premium materials like cushioned rubber or acrylic for your court surface. These materials can provide better shock absorption and create a more professional feel.
- Install a permanent net system for a more professional look and feel.
- Install lighting. If you plan to play in the evening or at night, you should add lighting.
- Add seating and shade. Consider adding benches or seating, as well as a shade structure to protect players from the sun.
- Use high-quality perimeter fencing such as vinyl or aluminum for a more polished appearance.
- Choose the right location with minimal slope and good drainage.
These courts can cost anywhere from $10,000-$20,000 or more, depending on the size and materials used.
Find the Perfect Spot for Your Pickleball Court: Tips and Considerations
When choosing the location for your backyard pickleball court, there are some important factors to consider:
- Size. Make sure you have enough space for the pickleball court dimensions (20 feet wide by 44 feet long for a regulation-size court). You’ll also want to leave some extra room around for players moving.
- Sun exposure. Consider the angle of the sun at different times of day and how it will affect playing pickleball. A north-south orientation is ideal to minimize sun glare.
- Surface. Choose a flat to avoid any bumps or unevenness that could affect gameplay.
- Privacy. Consider whether you want your court to be visible from the street or if you prefer more privacy.
- Neighbors. Pickleball can be a noisy sport, so make sure you choose a location that won’t disturb your neighbors.

Measure Twice, Dig Once: Ensuring Accurate Pickleball Court Dimensions
Use a tape measure or a string line to mark out the pickleball court dimensions before you start digging. Check and double-check your measurements to ensure accuracy before beginning to dig.
Obtaining any necessary permits or permissions
Depending on where you live, you may need to obtain permits or permissions before building a backyard pickleball court. Check with your local government or homeowner’s association to see what regulations apply to your area. Failure to obtain the necessary permits or permissions could result in fines or even legal action.
Step 2: Building the Foundation
Once you’ve found the perfect spot for your outdoor pickleball court, it’s time to start building the foundation. This is arguably the most important step in the entire process, as a solid foundation will ensure that your court is level, stable, and long-lasting.
From Clearing to Leveling: Prepping Your Court Site Like a Pro
Before you start building the foundation, you need to make sure your court site is properly prepped.
Here are the steps you need to take:
- Clear the area of any rocks, debris, or vegetation. Use a shovel or a rake to remove any plants or roots that could interfere with the foundation.
- Level the area using a laser level. Make sure the court is level in all directions, with no dips or high spots.
- Tamp down the soil to create a firm base. You can use a hand tamper or a plate compactor to achieve this. Make sure the soil is compacted evenly throughout the court site.
Building the base layer with crushed stone
Once you’ve cleared and leveled the area, it’s time to add the base layer. Spread a layer of crushed stone over the entire court area, making sure it’s even and level. The depth of the crushed stone layer will depend on the type of soil you have and the amount of drainage you need. In general, the base layer should be at least 4-6 inches deep.
Make sure to use a geotextile fabric underneath the crushed stone to prevent weed growth and erosion.
Tamping and leveling the stone layer
Once you’ve spread the crushed stone evenly over the site, it’s time to tamp it down. Renting a plate compactor or hiring a contractor is a good idea as it will ensure a more professional job. Tamp the stone layer to ensure it is level and compacted. This will provide a stable base for the next layers of the court.
After tamping, use a level to make sure the stone layer is completely even. If you notice any low spots, add more crushed stone and tamp again until it’s level.
Installing the edge restraints
Finally, it’s time to install the edge restraints. These restraints will hold the layers of the court in place and prevent them from shifting or moving. Edge restraints can be made from different materials like treated lumber, pavers, or plastic. Make sure to use restraints that are strong enough to withstand the pressure of the layers above them and to keep the court from shifting over time.
Here’s how to do it:
- Dig a trench around the perimeter of the court site. The trench should be about 6 inches deep and 8 inches wide.
- Place the edge restraints in the trench. Make sure they’re level and even, with no gaps or overlaps.
- Fill in the trench with concrete. Use a trowel to smooth out the concrete and make sure the edge restraints are securely in place.
- Let the concrete dry completely before moving on to the next step.
By following these steps, you’ll have a solid foundation for your DIY pickleball court that will last for years to come.
Step 3: Choosing and Installing the Right Playing Surface
The right surface material can significantly affect the quality of play and the longevity of your court. There are several types of playing surfaces to choose from. Each has its own advantages and disadvantages, so it’s important to choose the one that’s right for your needs and budget.
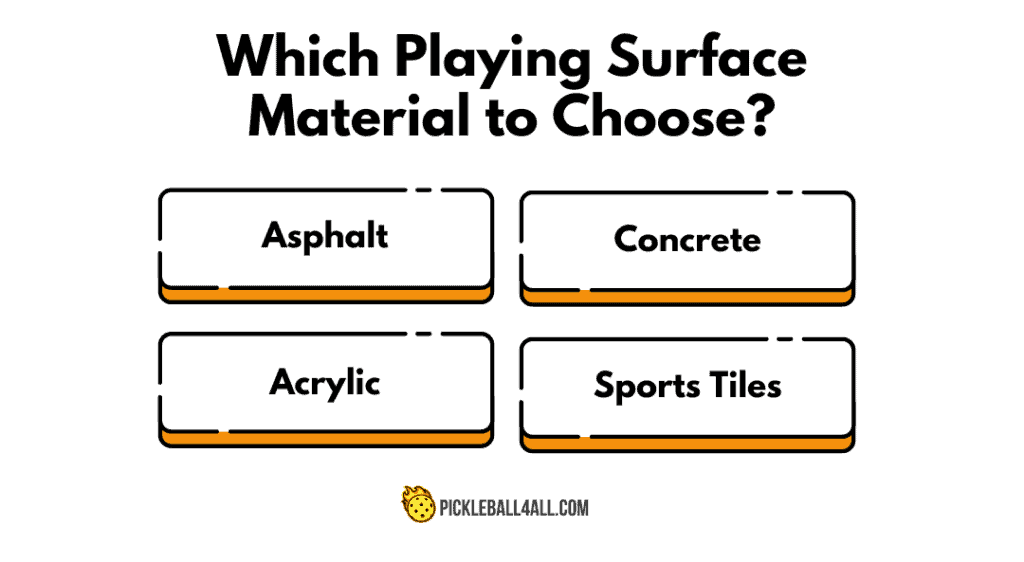
Asphalt, Concrete, Acrylic, or Sports Tiles: Which Surface Material is Best for You?
Asphalt is a popular choice for pickleball and tennis courts due to its durability. This is the most affordable option and is easy to install. However, it requires regular maintenance, can crack over time, and can be affected by extreme temperatures. Additionally, the surface can be rough, making it more difficult to play on.
Concrete is a popular choice for commercial and public courts. It’s more expensive than asphalt, but it’s also more durable and requires less maintenance. However, it can be slippery when wet and may not provide as much traction as other materials.
Acrylic is a premium option for pickleball courts. It is durable, slip-resistant, and provides a consistent bounce for players. Acrylic courts can last up to 15 years, making them an excellent investment for those looking for long-term use. However, acrylic can be expensive to install and can be affected by extreme temperatures.
Sports tiles have low maintenance and are easy to install, making them also a popular choice for pickleball and tennis courts. The cost of sports tiles falls into the low range, making it an affordable option for those on a budget.
Pouring and Curing Your Pickleball Court Surface
Once you have chosen your surface material, the next step is to prepare and install it properly. This can be a complicated process and may require professional help, depending on the type of surface material you’ve chosen.
Here are some general tips to keep in mind:
- Follow the manufacturer’s instructions carefully when pouring and curing your surface.
- Make sure the surface is level and smooth before applying the topcoat.
- Allow enough time for the surface to cure fully. It’s at least 7 days before any play takes place. This time will help ensure the surface is fully hardened and ready for use.
- Once the surface has cured, apply a sealcoat to protect it from UV rays, water damage, and other environmental factors.
Pickleball Courts Colors: Tips for Choosing the Right Colors
Finally, you’ll need to choose the right colors for your pickleball court. Some popular color combinations for pickleball courts include green and blue, red and green, or red and blue. You can also choose to add additional colors for a more personalized touch.
While there are no strict rules about court colors, there are a few things to keep in mind:
Step 4: Choosing and Installing Pickleball Net Systems
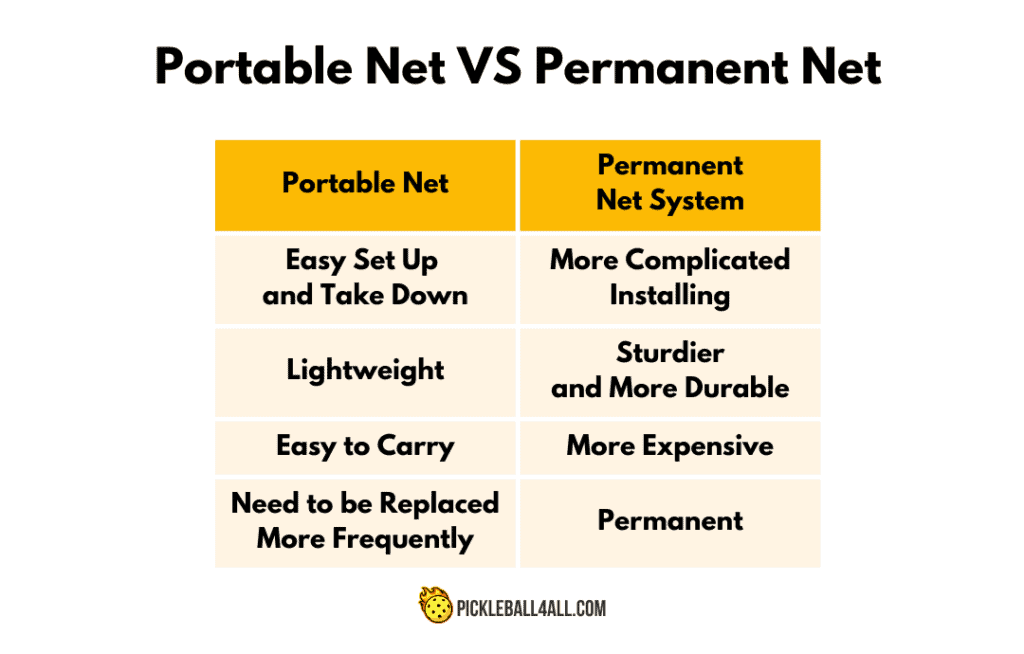
Portable Net Systems or Permanent Net Systems?
When it comes to pickleball net systems, you have two main options: portable or permanent.
Here are some things to consider when choosing between the two:
Portable Net Systems:
- Ideal for those who want to set up a pickleball court temporarily.
- Can be set up and taken down quickly and easily, without the need for any special tools or equipment.
- Can be made from lightweight materials such as aluminum, and come with their own carrying cases for easy transport.
- Generally not as sturdy or durable as permanent net systems, and may need to be replaced more frequently.
Permanent Net Systems:
- Designed to be installed and left in place permanently.
- Sturdier and more durable than portable ones, and may last longer.
- More expensive than portable ones.
- Installing can be more complicated and may require special tools or equipment.
If you plan to move your net frequently or want a temporary solution, a portable net may be the better option. If you want a more permanent fixture and don’t mind the additional cost, a permanent net system may be the way to go.
Netting It Right: Installation Tips for Your Pickleball Net System
No matter which type of net you choose, proper installation is essential for a safe and enjoyable playing experience.
Here are some tips for installing your pickleball net system:
- Your net system will be subject to a lot of wear and tear, so it’s important to use high-quality materials that are built to last.
- Make sure the net is centered over the court and at the correct height.
- Follow the manufacturer’s instructions.
- Secure your net properly to prevent sagging or movement during play.
- Keep your net taut and free of wrinkles or sagging.
- Test everything before you start playing to make sure everything is working correctly.
Step 5: Paint the Lines: Marking Your Court Like a Pro
Here’s what you need to know to create a professional-looking court.
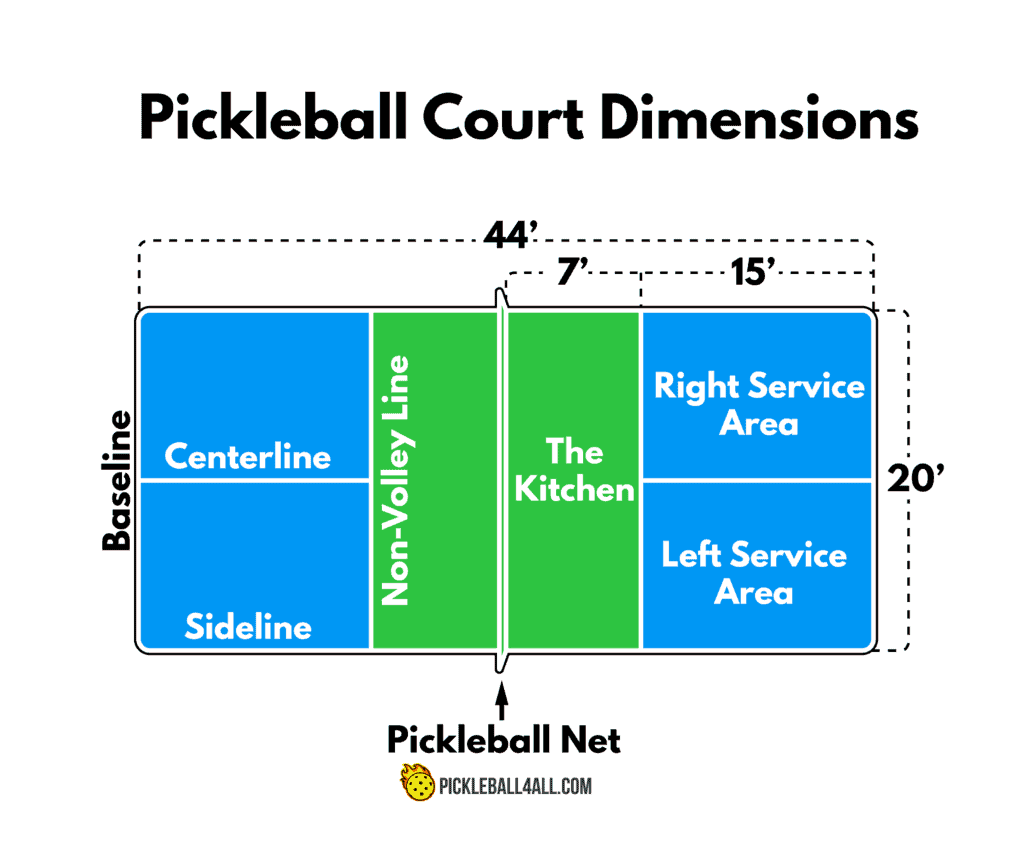
Pickleball Court Layout: Size, Markings, and Dimensions
Before you start painting, you need to ensure that your court’s layout is correct. The standard pickleball court size is 20 feet wide and 44 feet long, with a centerline that divides the court into two halves. Each half is 22 feet by 20 feet.
According to the USAPA (USA Pickleball Association), you will need to paint the following lines:
- Baselines (2)
- Service lines (2)
- Centerline (1)
- Non-volley zone line (2)
- Sidelines (2)
Painting the Court Lines and Markings
Here are the basic steps:
- Clean the surface of the court and let it dry.
- Tape the lines using painter’s tape or masking tape.
- Paint the lines using quality paint made for outdoor surfaces.
- Remove the tape before the paint dries.
- Allow the paint to dry completely before starting to play pickleball.
Pro tips:
Step 6: Pick Out Perimeter Fencing: Enhancing Safety and Boundaries
If you want to add more safety and boundaries to your court, adding perimeter fencing is an excellent option.
Choosing The Right Perimeter Fencing
When choosing the right perimeter pickleball fencing, consider the following factors:
- Durability. You should choose fencing that can withstand the impact of the ball and the occasional player collision.
- Visibility. Choose a fence with openings small enough to contain the ball but large enough for easy viewing.
- Height. The fence should be at least 10 feet tall to prevent the ball from going over and to provide enough clearance for players.
- Material. Choose a fencing material that is weather-resistant and requires minimal maintenance.
Popular materials for outdoor pickleball court fencing include vinyl-coated chain links, aluminum, and powder-coated steel.
Get a Fence Up: Tips for Installing Perimeter Fencing on Your Court
Once you’ve selected the appropriate fencing material, follow these tips for proper installation:
- Measure and mark the perimeter of the court before beginning installation.
- Clear any vegetation or debris within the perimeter.
- Set the fence posts at least 2 feet into the ground for stability.
- Attach the fencing material to the posts, ensuring it is taut and properly secured.
- Install a gate for easy access to the court.
A Noise-Reducing Option for Outdoor Pickleball Courts
Acoustic barriers made of sound-absorbing materials can significantly reduce the amount of noise that escapes your court, making for a more pleasant playing experience for you and your neighbors. These barriers are available in various sizes and can be customized to fit your specific court dimensions.
In conclusion, perimeter fencing is an important element in constructing your own backyard court. By choosing the right fencing material and properly installing it, you can enhance safety and add a professional look to your court. Don’t forget to consider a noise-reducing option if noise is a concern in your neighborhood. With these tips, you’ll be on your way to a great playing experience right in your own backyard.
Step 7: Adding the Final Touches
Adding Lighting (if desired)
If you plan to play pickleball in the evening, take care of adding lighting.
When selecting a lighting system, consider the following factors:
- Brightness. Look for LED lighting systems that offer a brightness of at least 4000 lumens per pole.
- Energy efficiency. Choose a system that consumes less power but provides sufficient light. Look for energy-efficient LED lighting systems that offer high-quality illumination.
- Durability. Pick lighting systems that can withstand harsh weather conditions and have a long lifespan.
- Installation. Look for systems that are easy to install and come with clear instructions.
Installing court lighting systems can be a DIY project, but it can be challenging, especially if you don’t have any experience with electrical wiring. Before you start, make sure you have the necessary tools and equipment and have a good understanding of electrical safety.
Adding Benches or Seating (if desired)
Incorporating benches or seating areas can provide a comfortable and convenient spot for players to take a break between games or to watch others play. Be sure, to place benches or chairs in a shaded area to provide relief from the sun during hot weather.
When choosing seating, consider the following factors:
- Comfort. Pick seats that are comfortable and provide ample support.
- Durability. Look for seating that is weather-resistant and can withstand constant use.
- Style. Select seating that complements the overall design of your court.
There are several seating options available for pickleball courts, such as:
- Bench seating. Benches are a great option if you want to provide seating for multiple players or spectators. They are available in various sizes and materials, such as wood or metal.
- Individual seating. If you have limited space, individual seats are a great option. You can select from various styles, such as stadium seats or Adirondack chairs.
- Stools. Stools are another great option for smaller spaces. They can be easily moved around and stored away when not in use.
By following these final steps, you can take your DIY pickleball court to the next level and create an enjoyable playing experience for you and your friends or family.

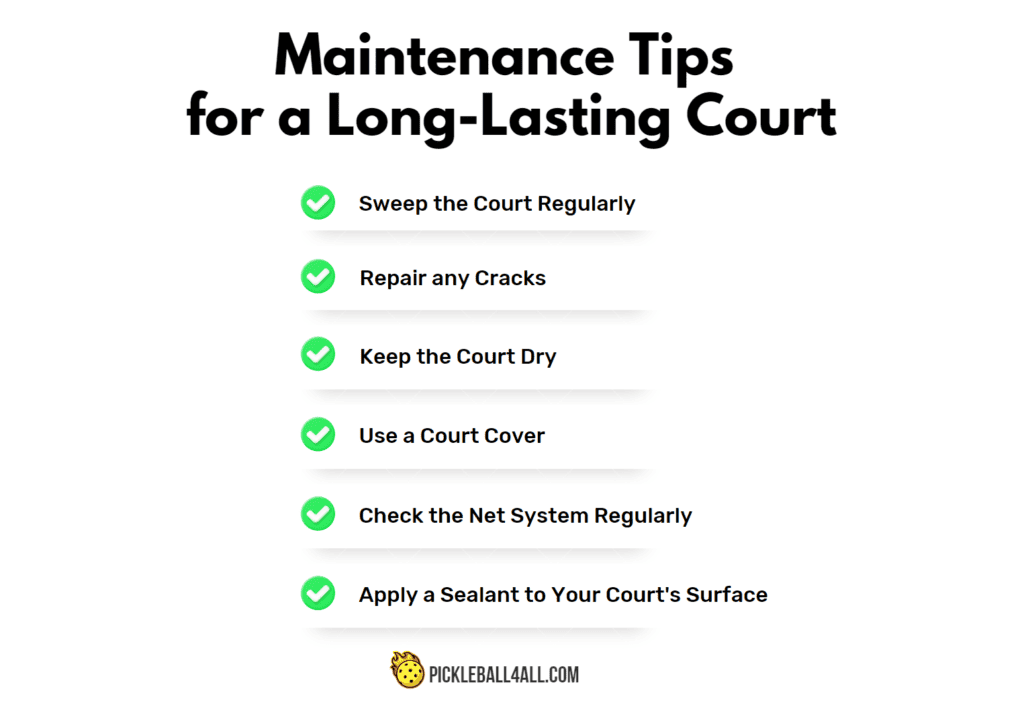
Maintenance and Care Tips for a Long-Lasting Court
With regular maintenance, you can extend the life of your court, ensuring it stays in good condition for years to come.
Tips for keeping your pickleball court in good condition
Here are some maintenance and care tips to keep in mind:
- Clean the surface regularly. Dirt, debris, and leaves can accumulate on the court surface and affect playability. Sweep or blow the court regularly to keep it clean.
- Repair any cracks or damage. Over time, cracks and damage may occur to the court surface. Repair these issues as soon as possible to prevent further damage and maintain a safe playing surface.
- Keep the court dry. Water can damage the court surface and create a slippery playing surface. Use a squeegee to remove any standing water after rain or dew.
- Protect the court from the weather. Sun, rain, and snow can all take a toll on your pickleball court. Use a court cover or tarp to protect it when not in use.
- Inspect the net. Check the net system regularly to ensure that it is secure and in good condition. Replace any worn or damaged parts as needed.
- Apply a sealant to your court’s surface every few years to protect it from the elements and keep it looking like new.
Keep in mind that different types of surfaces may require different cleaning and repair methods.
By following these tips, you can help ensure that your outdoor pickleball court stays in top condition for years to come, providing you and your friends with many hours of fun and competition.
How to store and maintain your net and accessories
To keep your net and accessories in good condition, follow these tips:
- Keep your net and accessories clean by wiping them down with a damp cloth after use.
- Store the net and net posts in a dry, cool location when not in use.
- Check the net tension regularly and adjust as needed.
- Replace any worn or damaged parts, such as the net or net posts.
Pros and Cons of Hiring a Professional vs. Building Your Own
If you’re considering building a pickleball court in your backyard, you may be wondering whether you should hire a professional or tackle the project yourself. While building your own court can be a fun and rewarding DIY project, it may not be the right choice for everyone. Let’s take a look at the pros and cons of each option.
Building Your Own
Pros
- Cost savings
- Customization
- Satisfaction
Cons
- Difficulty
- Purchasing and transporting the materials
- Quality
- Time and effort
Hiring a Professional
Pros
- Expertise
- Time savings
- Quality
Cons
- More expensive
- Lack of customization
Ultimately, the decision to build your very own pickleball court or hire a professional will depend on your budget, timeline, and DIY skills.
Picking the Right Builder: Considerations for Hiring Professional Court Builders
If you decide to hire a professional pickleball court builder, there are several things to consider before making your choice.
Here are a few key considerations:
- Experience. Look for a builder with experience building outdoor pickleball courts specifically, as they will have a better understanding of the unique requirements of the sport.
- Reputation. Do your research and read reviews from other customers before choosing a builder to ensure they have a good reputation for quality work.
- Cost. Get quotes from several different builders and compare them to ensure you are getting a fair price.
- Insurance and Licensing. Make sure the builder you choose is licensed and insured to protect yourself in case of any accidents or damage during the construction process.
Conclusion
Congratulations! You have reached the end of this guide on how to build a pickleball court in your backyard. We hope you have found the information helpful and inspiring.
Now that you have all the information you need, it’s time to start your project.
These pro tips can help ensure your project is a success:
- Choose quality materials that can withstand harsh weather conditions and frequent use.
- Prepare the ground properly.
- Plan for a drainage system to prevent water from pooling on the surface.
- Take safety precautions. Wear protective gear, such as gloves and safety glasses.
- Use a laser level for accurate court dimensions.
- Rent a plate compactor to save time and effort in building the stone base.
- Apply a sealcoat to protect your court surface.
If you have any questions or concerns, don’t hesitate to reach out to professional court builders or other experienced pickleball enthusiasts for advice. We wish you the best of luck on your court construction journey!
FAQ
Do I need a permit to build a pickleball court in my backyard?
Permit requirements for building a court may vary depending on your location and local building codes. It’s important to check with your local authorities and obtain any necessary permits or approvals before starting your building.
How much does it cost to build a pickleball court in my backyard?

The cost of building a court can vary depending on factors such as materials used, court size, and whether or not you hire a professional to do the installation. On average, it can cost anywhere from $10,000 to $50,000+. Check this post about the prices.
Can I make a pickleball court in my driveway?
Yes, you can make a court in your driveway if you have enough space and a flat driveway surface. You can use temporary lines or paint to mark the court boundaries. You may also want to consider installing a net that can be easily set up and taken down.
How to Convert Tennis Court to Pickleball Court?
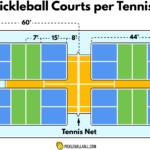
You can easily convert a tennis court into a new pickleball court or even four pickleball courts. Yep, a standard tennis court can fit four pickleball courts! You should add non-volley lines and divide the space. Also, you need to adjust the tennis net height for pickleball or remove it and install a new pickleball net system. With a little effort, you can transform an existing court into multiple courts to play pickleball.
What is a pickleball court and how does it differ from a tennis court?
A pickleball court is a specified area where the sport of pickleball is played. It differs from a tennis court in terms of its court dimensions, size of the net, and some other features. The standard size of a pickleball court is 20×44 feet, which is significantly smaller than a tennis court. The pickleball net is 34 inches high at center while tennis net is higher. Furthermore, a pickleball court has special non-volley zones, also called “kitchen”, extending 7 feet from both sides of the net.
How can I build my own DIY pickleball court?
Creating a DIY pickleball court is an exciting project that requires some planning and preparation. The process involves deciding on the court location, marking the dimensions of the court, planning and creating the surface, and finally installing the pickleball net. You can use sidewalk chalk or temporary paint to draw the court lines, which should include the sidelines, baseline, and the non-volley zone.
What are the ideal conditions to build an outdoor pickleball court?
Building an outdoor pickleball court ideally requires a flat and level area with enough space around for safe play. The court surface can be composed of asphalt, concrete, or an acrylic finish. It should be crack and obstruction free. The court should be fenced with a typical fence height of at least 36 inches to prevent balls from exiting the field of play.